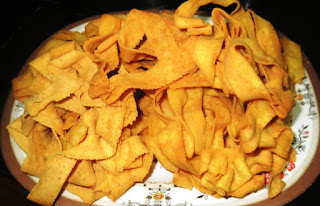
Ribbon Pakoda or a stripe or string of fried pieces are delicious to munch. I think because of its chain style and long strip its called as ribbon. Pakoda is some fried items which can be eaten during snack time. It is almost similar to our sev or karasev (spicy sev). Though it is fried the mind pulls you to have them with hot coffee or tea even fruits juices. You can prepare Ribbon Pakodas in using different ingredients. Using only besan, besan with rice flour, besan and urid flour, besan with roasted channa etc. Each kind has its own taste and all age group can enjoy munching this ribbon pakdoas.
Here I have tried this Ribbon Pakoas with rice flour and besan flour, little jeera powder and butter.
Lets see the recipe.
Rice flour :1 Cup
Butter : 1 Tablespoon
Chilly Powder : 1 Teaspoon
Jeera Powder: 1 Teaspoon
Salt :to taste
Oil : To Fry (2 cups)
2. Add butter and mix it nicely.(dry ingredients).
3. Add required water and prepare the dough.
4. Keep a pan on the fire. Heat the pan and then put oil. Let it become hot.
5. Take a prepared dough and mix it again and divide into equal parts.
6. Wash chakkuli mould and then keep ribbon pakoda plate inside.
7. Fill chakkuli mould with besan - Rice flour dough. close it with upper part.
8. Now press and leave the dough in the hot oil and prepare ribbon pakodas.
9. Let it cook on both sides. Remove from the oil and place on kitchen tissue. It helps to absorb extra oil.
10 Repeat the same with remaining dough and prepare the rest of Ribbon Pakodas.
11. Put them in a airtight bottle or box and you can have them whenever you want.
12. Serve Crispy Ribbon Pakodas with a cup of coffee or tea.
Time : 30 to 40 Minutes.
Here I have tried this Ribbon Pakoas with rice flour and besan flour, little jeera powder and butter.
Lets see the recipe.
Things Needed :
Besan/Gram flour :2Rice flour :1 Cup
Butter : 1 Tablespoon
Chilly Powder : 1 Teaspoon
Jeera Powder: 1 Teaspoon
Salt :to taste
Oil : To Fry (2 cups)
Method :
1. Put Rice flour, besan, chilly powder, jeera powder and salt in a big bowl.2. Add butter and mix it nicely.(dry ingredients).
3. Add required water and prepare the dough.
4. Keep a pan on the fire. Heat the pan and then put oil. Let it become hot.
5. Take a prepared dough and mix it again and divide into equal parts.
6. Wash chakkuli mould and then keep ribbon pakoda plate inside.
7. Fill chakkuli mould with besan - Rice flour dough. close it with upper part.
8. Now press and leave the dough in the hot oil and prepare ribbon pakodas.
9. Let it cook on both sides. Remove from the oil and place on kitchen tissue. It helps to absorb extra oil.
10 Repeat the same with remaining dough and prepare the rest of Ribbon Pakodas.
11. Put them in a airtight bottle or box and you can have them whenever you want.
12. Serve Crispy Ribbon Pakodas with a cup of coffee or tea.
Note :
You should add water little by little as it required while preparing the dough. Too much of water in the dough may take more oil. Adding little more butter is optional.( another half a tablespoon). Using more oil for frying is also optional. Adding ajwan or jeera seeds also optional. But it clots while dropping the dough to the oil. Adding more chilly is also optional.Time : 30 to 40 Minutes.


