Showing posts with label Avalakki. Show all posts

Wednesday, June 6, 2018

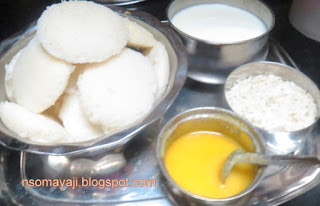
Quick Avalakki Idli ( Without Urid Dal).

When you crave to eat idli in the moring, when you do not have fermented idli batter, when your urid dal stock finished, you have no patience to soak and grind idli batter I think you can try and enjoy this Quick Avalakki Idli. ( with out Urid dal).

Here I have tried Avalakki Idli and it has no urid dal or no fermentation either. Just used rice rava, curd and avalakki/poha/aval/atukalu.
Idli is one of the best breakfast food that every one agrees I think. I do love idli and prepare varieties of idli for breakfast/snack time or even dinner. I do prefer idli because it is steamed and very little oil/ghee is used in the whole process. (Just to apply for idli plates ghee/oil is used).
Varieties of idli can be prepared namely, urid idli, dal idli, pumpkin idli, jack fruit idly, mango idli and so many varieties and so many shapes.

Let us see this idli recipe now :

Things you need :

Idli Rava/Akki Idli Rava : 2 Cups
Thick variety of Avalakkii /Beaten rice/Poha/ Aval/Atukulu : 1 Cup
Curd : 1 Cup 
Salt : As required 
Eno Salt : 1 Teaspoon
Ghee/Oil : 1 Teaspoon
Idli plates /Any cooker container
Idli cooker /Pressure cooker ( I have used Pressure Cooker).


Method :

1. Wash and soak Avalakki/Beaten rice in thick curd for 10 to 15 minutes.
2. Wash rice rava and drain all the water and let it rest.

3. Now grind avalakki till it turn paste or rava consistency.

4. Remove from the mixi jar and put it in a big bowl.

5. Add rice rava with ground avalakki, add salt and leave it for 5 to 10 minutes.
6. Put little water in the pressure cooker and keep it on fire.
7. Wash idli plates and apply ghee/oil to each mould in idli plate. Keep them ready.
8.  Now add a teaspoon of Eno salt to rice rava, avalakki, curd mixture and mix it well.


9.  Add a teaspoon of Eno Salt and stir the batter nicely. Mix it again and take a ladle and pour idli batter to each idli mould.

10. Arrange the idli plates with idli batter and keep it in a pressure cooker/idli cooker.
11. Cover the lid and cook for 10 minutes. Put off the gas.
12. Remove cooked idli from the cooker. Let it cool for a minute.


13. Remove soft, fluffy idli from each idli plate with a help of spoon or knife edge.


14. Put all the idli in a serving dish and serve with chutney /sambar/pickle or any other side dish.

15. Add a spoon of ghee just before serving.


Note :

Idli batter should be loose, add water if required. ( Do not make the batter watery, idli may not turn as fluffy).
Add Eno salt at last just before you put idli batter in idli plate. No need to rest the batter after adding Eno Salt. ( They might turn hard and will not be fluffy if you allow the batter to rest after adding Eno salt).
Adding thin avalakki is optional. Use thick curd to mix then use butter milk to dilute the batter. It should be like normal idli batter. (Urid + Rice idli batter). Washing idli rava is optional. 
Time : Preparation : 20 Minutes + Cooking time : 10 Minutes = Total time = 30 minutes.
20 idli can be prepared. ( According to the size ).

ಅವಲಕ್ಕಿ ಇಡ್ಲಿ ಮಾಡೋ ವಿಧಾನ ..ಸಂಕ್ಹೀಪ್ತವಾಗಿ 

ಅಕ್ಕಿ ರವೆ  : 2 ಲೋಟ
ದಪ್ಪ ಅವಲಕ್ಕಿ : 1 ಲೋಟ
ಗಟ್ಟಿ ಮೊಸರು : 1 ಲೋಟ
ಉಪ್ಪು: ರುಚಿಗೆ ತಕ್ಕಷ್ಟು 
ಇನೋ ಸಾಲ್ಟ್ :  1 ಸಣ್ಣ ಚಮಚ 
: ಮಾಡುವ ವಿಧಾನ :
ಅವಲಕ್ಕಿಯನ್ನು ಚೆನ್ನಾಗಿ ತೊಳೆದು ಮೊಸರಿನಲ್ಲಿ ಕಲಸಿ ೧೦ ನಿಮಿಷ ಹಾಗೆ ಇಡಿ.
೧೦ ನಿಮಿಷದ ನಂತರ ನೆನೆಸಿದ ಅವಲಕ್ಕಿಯನ್ನು ಮಿಕ್ಷಿ ಮಾಡಿ ದೊಡ್ಡ ಪಾತ್ರೆಗೆ ತೆಗೆಯಿರಿ.
ಅರೆದ ಅವಲಕ್ಕಿ ಮೊಸರಿಗೆ ಅಕ್ಕಿ ರವೆಯನ್ನು ತೊಳೆದು ಬೆರೆಸಿ. 5 ನಿಮಿಷ ಹಾಗೆ ಬಿಡಿ.
ಈಗ ಇಡ್ಲಿ ತಟ್ಟೆಗೆ ಚೂರು ತುಪ್ಪ ಅಥವಾ ಎಣ್ಣೆ ಸವರಿ. ಇಡ್ಲಿ ಕುಕ್ಕರ್ ಅಥವಾ ಪ್ರೆಸರ ಕುಕ್ಕರಿಗೆ ಸ್ವಲ್ಪ ನೀರು ಹಾಕಿ ಒಲೆಯ ಮೇಲಿಡಿ 
ಇಡ್ಲಿ ಹಿಟ್ಟಿಗೆ ಇನೋ ಸಾಲ್ಟ್ ಹಾಕಿ ಚೆನ್ನ್ನಾಗಿ ಕಲೆಸಿ, ತುಪ್ಪ ಸವರಿದ ತಟ್ಟೆಗೆ ಹಾಕಿ ಇಡ್ಲಿ ತಟ್ಟೆಗಳನ್ನು ಒಂದೊಂದಾಗಿ ಜೋಡಿಸಿ ಕುಕ್ಕರ್ ನಲ್ಲಿಡಿ. ಕುಕರ್ ನ ಮುಚ್ಚಳ ಮುಚ್ಚಿ ೧೦ ನಿಮಿಷಕಾಲ ಬೇಯಿಸಿ . ( ಪ್ರೆಶರ ಕುಕ್ಕರ್ ಆದಲ್ಲಿ ಅದರ ವೆಯಿಟ್ ಇಡಬೇಡಿ.
ಹಬೆಯಲ್ಲಿ ಬೇಯಿಸಬೇಕು )
ರುಚಿ ರುಚಿಯಾದ ಮೃದುವಾದ ಇಡ್ಲಿ ಸವಿಯಲು ಸಿದ್ದ . 
ಓದಿ, ಮಾಡಿ ನಿಮ್ಮ ಅಭಿಪ್ರಾಯ ತಿಳಿಸಿ ...

Wednesday, May 2, 2018

Onion - Avalakki Uppugari

Avalakki Uppugari/Quick Avalakki is one of the very famous dish from Udupi and Dakshina Kannada region. Any time you can prepare this Avalakki and enjoy. 


I remember those days I spent in Udyavara near Udupi. My doddamma and doddappa had paddy field and they used to grow paddy, cow peas, horse gram, urid etc, etc,  etc. There were some workers staying in near by our house. My doddamma was  kind hearted woman who used to prepare breakfast for all the workers who come in the early morning for work. This Avalakki Uppugari is very famous and every one's favourite. My doddamma never used onions and instead of that she used to add more coconut. 
Avalakki Uppugari and a cup of Chai goes hand in hand at any time of the day.
Wherever you go or in many Konkani Hotels this type of Avalakki chat is available even now. (Even in small villages).
 I have used onions and little fried shavige (Sev). Thin Avalakki, coconut, jaggery and coconut oil's seasoning is added and that gives a yummy taste to Avalakki Uppugari.
Let us see the recipe now :

Things Needed :

Thin variety Avalakki : 2 Cups ( 2 Handful)
Coconut :  3 to 4 Tablespoons
Jaggery : 2 Teaspoons
Salt : A little ( As required )
Rasam Powder : 1 Teaspoon
Thin variety of Sev : 1/2 Cup/5 to 6 Tablespoons
Seasoning :
Coconut Oil : 2 Teaspoons
Urid dal : 1/2 Teaspoon
Mustard Seeds : 1 Teaspoon
Red chilly ( Byadagi ) : 1 
Curry Leaves : 6 to 8 or little more leaves 

Method :

1. Clean thin Avalakki/Poha/ Aval and keep it aside.
2.Grate fresh coconut and keep it aside.
3. Remove the outer layer of onion and cut into small pieces.
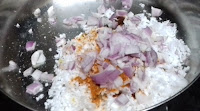
4. Take a big bowl, add grated coconut, cut onions, rasam powder, salt and jaggery. 
5. Mix all the ingredients and add avalakki and mix it well.

6. Keep a pan add coconut oil, mustard seeds and urid dal. Cut red chilly into 2 to pieces and add.
7. Let mustard seeds splutter. Add curry leaves and put off the fire.
8. Add this seasoning to ready Avalakki mixture. Mix it well nicely with hand.


9. Put it in a serving dish and add little Sev on the top and serve.


Note :

This Avalakki should be served as soon as you prepare it. Or it turns soft and onion added avalakki is not good for health. Adding onion is optional. It adds to the taste. Adding grated carrots is optional. I have not added. You should use fresh coconut. It adds to aroma and softens the avalakki. Adding Sev is optional. You can add roasted groundnuts. 

Time : 10 Minutes 
Serves : 2 to 3.

Sunday, April 1, 2018

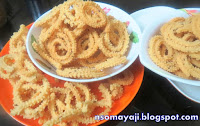
Crispy Chakkuli

Chakkuli /Cripsy Chakkuli/ Muruku/Chakli is loved by almost all people in the world. Crispy chakkulis are very good snack for all the age group. There are varieties of chakkuli available in the shops. But it is always better to eat home made food. Here is a Crispy Chakkuli tried by me. I am sure you all love to have it and do prepare and enjoy each bit of it.
I have used rice flour, thick variety of Avalakki/Aval/Poha and roasted chenna/Hurikadale/Pottu kadale.


Chakkulis are favourite of many and you can munch them at any time of the day. Good for kids snack box, travelling, ladies kitty party, festival or feast and any other type of parties to serve as starters.
We do love chakkuli and I always try different types of chakkuli recipes from different pages /groups whatsapp extra. This particular chakkuli recipe is from Indira Upadya's post in Healthy Home made food. The chakkulis were so inviting and it made me crave for chakkuli.  I did changes according to my taste and prepared chakkuli and they turned out crispy and crunch.We all loved it very much.
Let us see the recipe  :

Ingredients :

Rice flour : 2 1/2 to 3 cups.
Avalakki : Thick :  1 Cup
Roasted Chenna/Huri Kadale/ Pottu Kadale : 1/2 Cup
Butter : 1 to 1  1/2  Tablespoons
Sesame Seeds : 1 Tablespoon
Jeera/Cumin Seeds : 1 Teaspoon 
Chilly Powder : 1 Teaspoon
Salt :As required 
Water : As required 
Cooking Oil : 2 Cups


Method : 

1. Clean and dry grind Avalakki into powder form. 
2. Dry roast chenna slightly and dry grind it when it cools. Keep it aside. Dry roast rice flower for a minute and let it cool. 
3. Take a big bowl and put rice flour, powdered avalakki, powdered roasted chenna.
4. Add Butter, salt, chilly powder, sesame seeds and jeera/cumin seeds.
5. Mix all the ingredients nicely and then add required water slowly and prepare chakli dough. Kneed it the dough well. 


6. Kneed the dough nicely and divide the dough in to small portions.


7. Keep a frying pan on the fire and heat. Add oil and let it get heated. 
8. Take one portion of the chakkuli dough and fill in the chakkuli mould.
9. Press chakkuli on a plate or a wet towel. Put already pressed chakkuli in hot oil.


10. Let it fry on medium heat. Fry on both sides. Remove and put it on a kitchen towel/tissue.

11. Repeat the same and prepare rest of chakkuli.


12. Serve or eat whenever you feel like. Store it once it is cooled in a air tight box/bottle.

Note :

1. Dry grind avalakki into thin powder. Or it might stuck in the chakkuli plate while preparing chakkuli and is difficult to press chakkuli dough.
2. Avalakki absorbs water and the dough might turn hard. Take care of the dough and cover with wet clean towel. ( After preparing the dough). 
3. Kneed the dough well once again while inserting the dough into chakkuli mould. (It should be soft not watery). 
4. Fry chakkuli on medium heat. Fry nicely till they turn golden brown. Turn the other side and fry it. 
Adding more jeera/sesame seeds, chilly powder is optional. 
5. Adding more butter turns the dough very soft and it might absorb more oil. 
6. Try the small quantity first and then try the large quantity. ( Is always better to try small quantity).
7. Add more chilly powder makes the chakkuli very spicy. ( Not that good for kids and elders).
Time : 40 Minutes.
Serves : 25 to 30 Chakkulis can be prepared. (According to shape and size).

Saturday, February 10, 2018

Carrots -Coriander leaves & Avalakki Cutlets

Cutlets are one of the yummy snack that most of the people and kids love it.  They are spicy, tasty and stomach filling. They are done in many ways. I have just tava/pan roasted the cutlets, used very little oil to shallow fry.


I have used wheat bread crumbs, carrots, coriander leaves, avalakki /poha/flattened rice to give a good bind. Cooked on tava using little oi.
No Onion and No garlic is added here.
Green chutney is also done at home and it is an easy dish.
Let us see the recipe now :

Things needed :

Carrots : 2 +  2
Coriander leaves : 1 small bunch
Bread crumbs : 1 Small bowl. ( 4 to 5 slices)
Garam Masala Powder : 1/2 Teaspoon
Jeera Powder : 1/2 Teaspoon
Salt : As required
Jeera : 1/2 Teaspoon
Ginger : An inch
Avalakki /Flattened rice/Poha : 1 Cup
Oil : 2 to 3 Tablespoons

Method :

1. Dry grind bread and keep it aside. (Including the sides).

2. Wash and remove the outer layer of carrots and grate 2 carrots. Cut green chilly into small pieces.
3. Wash and clean coriander leaves nicely. Cut them into very small pieces. Wash and remove the outer layer of ginger, wash it again and grate it.
4. Wash thick avalakki and remove  all the water.

5. Now take a big bowl. Add grated carrots, ginger, powdered bread and cut green chilly.
7. Add cut coriander leaves and washed avalakki. and the spices like jeera, garam masala powder and turmeric powder. Add required salt.

8. Mix all the ingredients nicely and keep it aside. Do not add any water. It mixes well with avalakki/poha and bread crumbs.
9. Kneed the mixture nicely and divide them into small portions.

10. Take small portion and give a desired shape.
11. Keep a pan on the fire and heat. Add some oil and place the cutlets you have done.
12. Cook them on low flame till they turn slightly golden brown. Turn the other side add oil and cook.

13. Remove from the pan and serve hot cutlets as you wish.

14 We had the cutlets with like this.
a)  Cutlets with carrot's gratings and spicy sweet and spicy chutney.

b) Cutlets with carrots and pomegranate

c) Cutlets with little fried cornflakes


d) Cutlets with all the above mixture and curd.

Note :

Little carrot gratings should be kept aside for serving with cutlets.
You can deep fry the cutlets. (optional). You can use more oil and shallow fry it. (optional).
You can also use minimum oil and cook on low flame. (optional).
You can also use lots of other vegetables like beans, peas, capsicum. (Optional).
I have done with only carrots and coriander leaves. Use of bread slice edge is optional. ( I have used).
Use of other spices like chat masala/amechur powder or any other masala is optional.
Use of more chilly/red chilly powder is optional.
No potato is used here. Use of potatoes, onions or garlic is optional.
Time : 30 Minutes.
Serves : 3 to 4. ( Shape ans size matters).
Type : Indian snack.

Green chutney preparation :

Clean and wash coriander leaves, pudina/mint leaves and green chilly.
Grind coriander leaves, mint leaves, green chilly, 3 to 4 soft dates,  little tamarind and salt with minimum water. Add water whenever you want the chutney to be little more liquid. 

Jack fruits Seeds Tikki

Jack fruits are healthy Seasonal fruits. The seeds also contain lots of good vitamins and minerals.  After eating the fruit we throw away th...

About

author
My name is Nalini Somayaji. Teaching is my profession. Cooking is my passion. Reading, travelling, visiting new places, having fun with kids are some of the hobbies I can say. My recipes are Healthy, quick, easy and simple. Grown up being a traditional family member I love and respect Indian culture and traditions. Love classical dance and music.
Learn More →