Showing posts with label 30 mins. Show all posts

Tuesday, June 12, 2018

Basale & Dil Leaves Kootu /Curry

Basale leaves are known as Malabar leaves and Dil leaves are sabbassige soppu in Kannada.
This Kootu is goes well with almost all the main dishes.


Basale and dil leaves are from our garden. We do grow flowers and little vegetables in pots on our terrace. It gives so much pleasure when you use your homegrown vegetables.
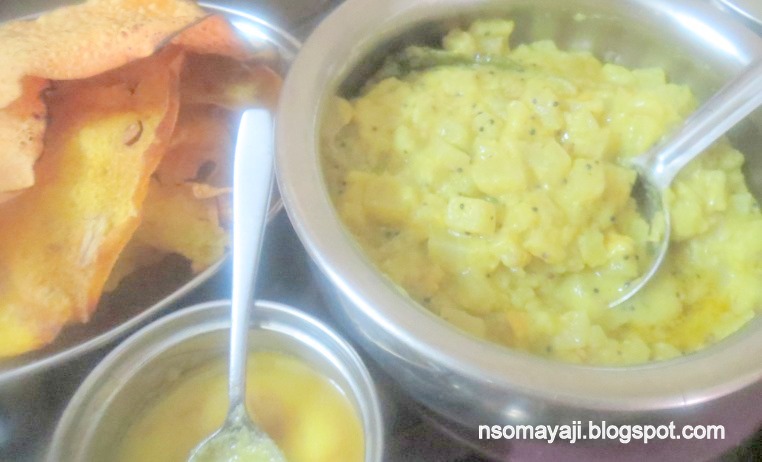
I have used pepper, green chilly, beans, leaves, toor dal jeera and mustard seeds.
Let us see the benefits of black pepper in our diet.
Black pepper is used since ancient time in cooking and it rich source of medicinal values. It is good for cough, cold, fever and stomach upset. It helps to improve the digestion in our body. It is good remedy for intestinal gas. It has good antioxidant properties. It helps to improve our immune system.
It is loaded with magnesium, Vitamin K, Iron and fiber. It adds taste to the food we eat.
Black Pepper/Pepper Corn is also used in easing aches, muscle pains and inflammatory arthritis. It has antibacterial, antioxidant and immune boosting properties.
Let us see the recipe Now :

Ingredients :

To Cook:
Basale/Malabar leaves : 1 Bowl (1 Small bundle)
Dil /Sabbassige leaves : 1/2 bowl. ( 1 Small bundle)
French beans : 250 Grams
Moong Dal : 1/2 Cup
To Grind : 
Fresh grated coconut : 1/2 Cup
Pepper pods : 4 to 5
Jeera/Cumin seeds : 1/2 Teaspoon
To add :
Salt : As required
Coriander leaves : 2 Tablespoons
Ground coconut masala
Green chilly : 2 to 3 
Seasoning :
Coconut Oil : 1 Tablespoon
Mustard seeds : 1/4 Teaspoon
Jeera/Cumin seeds : 1/4 Teaspoon
Curry Leaves : 6 to 8 Leaves
Ingh/Asafoetida : A little


 Method :

1. Clean and wash the leaves, cut off the hard stem and cut the leaves into small. (Basale and Dil leaves). Wash and cut curry leaves, slit green chilly and cut coriander leaves into very small.

2.Wash and remove the edges of beans and cut into very small pieces.
3. Wash and cook moong dal in a pressure cooker.


4.Cook leaves and cut beans separately in a pan with required water. Add slit chilly to it.
5. Grate coconut and grind it with jeera, pepper pods and 1/2 teaspoon of mustard. Use required water to grind.

6. Keep a big bowl on the fire and put cooked leaves, beans and cooked moong dal.
7. Add a little turmeric powder, required salt and little water. Mix it nicely and let it cook for 2 to 3 minutes.

 8. Add ground coconut mixture and mix it well. Let it boil for 2 to 3 minutes.


 9. Shift   Basale & Dil leaves Kootu to a serving dish.
10. Add coconut oil, mustard seeds, jeera, ingh and curry leaves seasoning to Hot Kootu.
11. Add cut coriander leaves on the top.
12. Serve with any choice of your main dish with Basale & Dil Leaves Kootu Curry.


Note : 

Cooking leaves and beans separately is always better or it will be over cooked in pressure cooker.
Adding more chilly is optional. Adding jeera /cumin seeds helps the curry to digest well. Adding a teaspoon of lemon juice is optional. ( I have not added). Adding a cup of thick curd is optional. It taste different.
Time : 30 Minutes
Serves : 4 to 5 
Purely South Indian Dish.

Wednesday, June 6, 2018

Quick Avalakki Idli ( Without Urid Dal).

When you crave to eat idli in the moring, when you do not have fermented idli batter, when your urid dal stock finished, you have no patience to soak and grind idli batter I think you can try and enjoy this Quick Avalakki Idli. ( with out Urid dal).

Here I have tried Avalakki Idli and it has no urid dal or no fermentation either. Just used rice rava, curd and avalakki/poha/aval/atukalu.
Idli is one of the best breakfast food that every one agrees I think. I do love idli and prepare varieties of idli for breakfast/snack time or even dinner. I do prefer idli because it is steamed and very little oil/ghee is used in the whole process. (Just to apply for idli plates ghee/oil is used).
Varieties of idli can be prepared namely, urid idli, dal idli, pumpkin idli, jack fruit idly, mango idli and so many varieties and so many shapes.

Let us see this idli recipe now :

Things you need :

Idli Rava/Akki Idli Rava : 2 Cups
Thick variety of Avalakkii /Beaten rice/Poha/ Aval/Atukulu : 1 Cup
Curd : 1 Cup 
Salt : As required 
Eno Salt : 1 Teaspoon
Ghee/Oil : 1 Teaspoon
Idli plates /Any cooker container
Idli cooker /Pressure cooker ( I have used Pressure Cooker).


Method :

1. Wash and soak Avalakki/Beaten rice in thick curd for 10 to 15 minutes.
2. Wash rice rava and drain all the water and let it rest.

3. Now grind avalakki till it turn paste or rava consistency.

4. Remove from the mixi jar and put it in a big bowl.

5. Add rice rava with ground avalakki, add salt and leave it for 5 to 10 minutes.
6. Put little water in the pressure cooker and keep it on fire.
7. Wash idli plates and apply ghee/oil to each mould in idli plate. Keep them ready.
8.  Now add a teaspoon of Eno salt to rice rava, avalakki, curd mixture and mix it well.


9.  Add a teaspoon of Eno Salt and stir the batter nicely. Mix it again and take a ladle and pour idli batter to each idli mould.

10. Arrange the idli plates with idli batter and keep it in a pressure cooker/idli cooker.
11. Cover the lid and cook for 10 minutes. Put off the gas.
12. Remove cooked idli from the cooker. Let it cool for a minute.


13. Remove soft, fluffy idli from each idli plate with a help of spoon or knife edge.


14. Put all the idli in a serving dish and serve with chutney /sambar/pickle or any other side dish.

15. Add a spoon of ghee just before serving.


Note :

Idli batter should be loose, add water if required. ( Do not make the batter watery, idli may not turn as fluffy).
Add Eno salt at last just before you put idli batter in idli plate. No need to rest the batter after adding Eno Salt. ( They might turn hard and will not be fluffy if you allow the batter to rest after adding Eno salt).
Adding thin avalakki is optional. Use thick curd to mix then use butter milk to dilute the batter. It should be like normal idli batter. (Urid + Rice idli batter). Washing idli rava is optional. 
Time : Preparation : 20 Minutes + Cooking time : 10 Minutes = Total time = 30 minutes.
20 idli can be prepared. ( According to the size ).

ಅವಲಕ್ಕಿ ಇಡ್ಲಿ ಮಾಡೋ ವಿಧಾನ ..ಸಂಕ್ಹೀಪ್ತವಾಗಿ 

ಅಕ್ಕಿ ರವೆ  : 2 ಲೋಟ
ದಪ್ಪ ಅವಲಕ್ಕಿ : 1 ಲೋಟ
ಗಟ್ಟಿ ಮೊಸರು : 1 ಲೋಟ
ಉಪ್ಪು: ರುಚಿಗೆ ತಕ್ಕಷ್ಟು 
ಇನೋ ಸಾಲ್ಟ್ :  1 ಸಣ್ಣ ಚಮಚ 
: ಮಾಡುವ ವಿಧಾನ :
ಅವಲಕ್ಕಿಯನ್ನು ಚೆನ್ನಾಗಿ ತೊಳೆದು ಮೊಸರಿನಲ್ಲಿ ಕಲಸಿ ೧೦ ನಿಮಿಷ ಹಾಗೆ ಇಡಿ.
೧೦ ನಿಮಿಷದ ನಂತರ ನೆನೆಸಿದ ಅವಲಕ್ಕಿಯನ್ನು ಮಿಕ್ಷಿ ಮಾಡಿ ದೊಡ್ಡ ಪಾತ್ರೆಗೆ ತೆಗೆಯಿರಿ.
ಅರೆದ ಅವಲಕ್ಕಿ ಮೊಸರಿಗೆ ಅಕ್ಕಿ ರವೆಯನ್ನು ತೊಳೆದು ಬೆರೆಸಿ. 5 ನಿಮಿಷ ಹಾಗೆ ಬಿಡಿ.
ಈಗ ಇಡ್ಲಿ ತಟ್ಟೆಗೆ ಚೂರು ತುಪ್ಪ ಅಥವಾ ಎಣ್ಣೆ ಸವರಿ. ಇಡ್ಲಿ ಕುಕ್ಕರ್ ಅಥವಾ ಪ್ರೆಸರ ಕುಕ್ಕರಿಗೆ ಸ್ವಲ್ಪ ನೀರು ಹಾಕಿ ಒಲೆಯ ಮೇಲಿಡಿ 
ಇಡ್ಲಿ ಹಿಟ್ಟಿಗೆ ಇನೋ ಸಾಲ್ಟ್ ಹಾಕಿ ಚೆನ್ನ್ನಾಗಿ ಕಲೆಸಿ, ತುಪ್ಪ ಸವರಿದ ತಟ್ಟೆಗೆ ಹಾಕಿ ಇಡ್ಲಿ ತಟ್ಟೆಗಳನ್ನು ಒಂದೊಂದಾಗಿ ಜೋಡಿಸಿ ಕುಕ್ಕರ್ ನಲ್ಲಿಡಿ. ಕುಕರ್ ನ ಮುಚ್ಚಳ ಮುಚ್ಚಿ ೧೦ ನಿಮಿಷಕಾಲ ಬೇಯಿಸಿ . ( ಪ್ರೆಶರ ಕುಕ್ಕರ್ ಆದಲ್ಲಿ ಅದರ ವೆಯಿಟ್ ಇಡಬೇಡಿ.
ಹಬೆಯಲ್ಲಿ ಬೇಯಿಸಬೇಕು )
ರುಚಿ ರುಚಿಯಾದ ಮೃದುವಾದ ಇಡ್ಲಿ ಸವಿಯಲು ಸಿದ್ದ . 
ಓದಿ, ಮಾಡಿ ನಿಮ್ಮ ಅಭಿಪ್ರಾಯ ತಿಳಿಸಿ ...

Saturday, June 2, 2018

Banana stem Dal

Banana Stem dal is one of the healthy dish and it is said that at least once in a year you must eat banana stem. It helps to cleanse your intestine. It also helps to remove or reduce the stone in gal bladder.

Banana plant is one of the God's gift to mankind. Each part of this plant is used by man.  Banana fruit to eat, banana leaf to have food, banana stem is used  medicine.  It has very good medicinal value and used in home remedy medicines.
Eating banana stem helps to cleanse our body and take care of our kidney. It helps to reduce or remove the stone formed in the kidney. It is said if have gulped the hair by chance it can bring out the hair from your body. But remember this stem should be used rarely. (Once in a while). Often used  It heats up the body and you might get ulcer in your mouth, the eyes might turn red because of excess body heat.
I have used banana stem, moong dal, tamarind tokku (tender tamarind green chutney) and some green chilly.
Let us see the recipe now :

Things Needed : 

Banana Stem : 1 Bowl
Moong Dal : 1/2 cup
Green chilly : 2 to 3 
Tamarind Tokku : 1 Teaspoon full
Salt : As required
Ginger : An Inch 
Seasoning : 
Coconut Oil :1 Teaspoon
Mustard seeds : 1/2 Teaspoon
Jeera/Cumin seeds : 1/2 Teaspoon


Method :

1. Wash and cut banana stem and remove the thread you get while cutting.
2. Cut it into very small pieces. Wash and soak them in plain water.

3. Wash and put moong dal in a pressure cooker and add cut banana stem.
4. Add little water and cook for 3 to 4 minutes.( Or little more).

5. Wash and cut coriander leaves, curry leaves and slit green chilly.
6. Wash and remove the outer layer of ginger and wash it again. Grate the clean piece and keep it aside.
7. Keep a pan on the fire and add oil. Let it get hot. Add mustard seeds and let it splutter.
8. Add jeera and cut chilly. Fry for 10 seconds. Add ingh and curry leaves.
9. Add cooked banana stem and moong dal. Mix it well. Add little water, grated ginger and required salt.
10. Mix it nicely. Add turmeric powder. Cook for 2 to 3 minutes.
11. Add tamarind tokku if you have or add tamarind pulp. ( 1 Tablespoon).

12. Mix it well and cook for another 2 minutes. Shift Banana stem Dal to a serving dish.

13. Add cut coriander leaves and serve.
14. Adding a tablespoon of ghee helps to enhance the taste.

Note :

You should soak banana stem pieces quickly in plain water. It helps to retain white colour as it is.
Adding any spice of your choice is optional. Adding tamarind pulp instead of tamarind tokku is optional. Adding more chilly and use of any cooking oil is optional. Adding water to get the thickness of the dal is optional. It taste better if it is bit thick. Do not get worried if the pieces are not soft and do not think they are not cooked well. They are bit hard even if cook them for long time even. So let the pieces be very small.
Time : 30 Minutes
Serves :  4 to 5. 

Tuesday, May 8, 2018

Maddur Vada ( NoMaida )

Maddur Vada is a fried fritter which has become very famous. It can be prepared in many ways. I have used wheat flour and little semolina/rava and rice flour.


Maddur is a small place near Mandya in Karnataka/India. May be this type of Vada is prepared first time in this place and must have got the name as Maddur Vada. You can lots of vendors selling Maddur Vada even in trains and bus stops.
I have used prestige vegetable cutter to cut onions, curry leaves and green chilly. The vegetable chopper helps to chop onions into thin pieces and it helps very much for mixing all the ingredients.
Let us see the recipe Now :

Ingredients :

Rice Flour : 2 Cups
Wheat Flour : 2 Tablespoons
Rava/Semolina/Medium sized : 1/2 Cup
Onions : 2  (Medium sized)
Green chilly : 2 to 3
Curry Leaves : One handful
Salt : As required
Jeera /Cumin Seeds : 1/2 Teaspoon
Cooking Oil : 1 Cup + 2 Tablespoons


Method :

1. Remove the outer layer of onions and wash it.  Cut it into big pieces ( 1 into 4 )
2. Wash green chilly, curry leaves and keep it aside.
3. Keep a pan on the fire and dry roast wheat flour till the raw smell goes off.  ( 2 to 3 minutes).
4. Take a big bowl and put rice flour and rava/semolina. Add roasted wheat flour to it. Add required salt.


5. Now chop onions, green chilly and curry leaves into small pieces.
( I have used a prestige chopper to chop all the above ingredients).

6 Put all the cut onion mixture to rice flour bowl.
7. Keep a small pan on the fire and put 2 tablespoons of oil. Heat it till its hot.
8. Pour this hot oil on the rice flour and leave it to cool.

9. Mix it well and then add water and prepare thick dough. ( Be careful while adding water).
10. Divide the dough into small portion.

11. Wet /take a drop of oil to your palm, take a small portion of dough and flatten with your fingers.
12. Keep  a frying pan on the fire. Add oil and heat.
13. Fry flattened Madduru vada in low and medium flame. Fry on both sides till golden brown.


14. Remove it from the hot oil and put it on  kitchen tissue.
15. Repeat the same and prepare the remaining vada.


16. Maddur Vada is nice to eat with a cup of coffee or tea or at any time of the day.


Note :

Do not put more water while preparing the dough. It the dough turns watery add little rava or rice flour to make the dough bit thick. Adding more hot oil might turn Vadas very soft and it might break in to small pieces while frying. Adding more onion is optional. Adding garlic to vada is optional.
I have not added garlic, since I do not like it. Let the dough be bit thick. I have used prestige manual chopper to cut onions, chilly and curry leaves. It helps the vegetables cut very thin, easy and avoids messy work.
Time : 30 to 40 Minutes.
Serves : 15 to 20 Maddura Vada can be prepared. According to size.


Jack fruits Seeds Tikki

Jack fruits are healthy Seasonal fruits. The seeds also contain lots of good vitamins and minerals.  After eating the fruit we throw away th...

About

author
My name is Nalini Somayaji. Teaching is my profession. Cooking is my passion. Reading, travelling, visiting new places, having fun with kids are some of the hobbies I can say. My recipes are Healthy, quick, easy and simple. Grown up being a traditional family member I love and respect Indian culture and traditions. Love classical dance and music.
Learn More →