Showing posts with label Curry. Show all posts

Sunday, May 3, 2020

Quick Lady Finger Gojju

Quick Lady finger gojju is a finger licking dish. I have tried this gojju with adding puliyogre gojju instead of using tamarind pulp.


The puliyogre gojju adds to Lady finger gojju and goes well with chapatis, rotis, poori, idli and dosa.
Lady fingers should be tender and it cooks faster when you fry with little oil, or it gets hard and it will not taste good when you use it for gojju.


Lets see some benefits of Lady finger in our diet.

Lady finger is good for eye sight and healthy skin. It is filled with Vitamin B9 and Vitamin C. It helps to improve our immunity system. Lady finger helps to reduce the weight. It is good for diabetes. 
It is filled with fiber and good for controlling the cholesterol.
It is an easy recipe and yummy taste to have it with many main dishes.

NO ONION OR NO GARLIC RECIPE.

Ingredients :

Lady finger :10 to 15.
Rasam Powder : 2 Tbs
Puliyogre Gojju : 1 Tbs
Jaggery : 2 to 3 Tbs
Salt : As required

For Seasoning :

Cooking Oil : 2 Tbs
Methi Seeds : 3 to 4
Mustard Seeds : 1/2 Tsp
Curry Leaves : 6 to 8
Ingh/Asafoetida : A little
Green chilly : 1

Method :

1. Wash and wipe out the moisture completely and cut into small pieces.

2. Keep a big pan on the fire and add oil. Heat it.
3. Add methi seeds, mustard seeds and ingh. Let mustard seeds splutter.
4. Add curry leaves and cut lady finger pieces. Fry till they turn soft.


5. Add salt and puliyogre gojju, little turmeric powder and jaggery.
Mix it well. Let it Cook for a while.


6. Add little water and let it cook for 3 to 4 minutes.
7. Add rasam powder and and mix it nicely.


8. Cook for another 2 to 3 minutes. Shift it to a serving bowl.


9. Add coriander leaves and serve with main dish of your choice.

Note :

You must wipe out the moisture in Lady finger completely or the gojju might turn sticky.
You can add tamarind pulp, jaggery, sesame powder instead of using puliyogre mix.
Adding more jaggery is optional. Fry lady finger nicely so that it does not get sticky.
Time : 30 Minutes.
Serve : 2 to 3.

Thursday, March 26, 2020

Mattina Gulla - Mango Curry

Mattina Gulla is a brinjal which is specially grown in place called Mattu near Udupi/Karnataka.
The brinjal /Mattina gulla has a special taste and any dish You prepare has a yummy taste. I am joking, it is really true.


These Mattina Gulla is brought from my brother in law when he came last week. I forgot post the gulla pic, since I was so busy with house chores.
I have used small mango with these Brinjal and the taste was heavenly.
I have written about Mattina Gulla and has some yummy recipes too in my blog. The seeds of Mattina Gulla was given to people in Mattu when they were struggling to lead normal life because of poor living. Shree Guru Vadhirajaru blessed and gave the seeds of Mattina gulla to those people who were very poor. With the blessings of Guruvarya, the brinjals gave a good yield and had the best taste in them. So these Mattina Gulla from Mattu has become very famous in that area and the poor people survived by selling these Gulla /Brinjals.
Even now the first yield of Mattina Gulla is given to Udupi Krishna Matt as a samarpane.
One has to taste Mattina Gulla Curry in Krishna Temple, in his or her life time to get the divine taste of the Curry.

No onion or No garlic is used in this Mattina Gulla - Mango Curry. 

Let us see the recipe now :

Ingredients :

Mattina Gulla /Brinjal : 2
Spices To Fry :
Urid dal : 1 Teaspoon
Methi Seeds/Fenugrik Seeds : 1/4 Teaspoon
Coriander seeds : 1 Tbs
Red chilly /Byadagi Chilly : 5 to 6
Ingh /Asafoetida : A little
To Grind :
Fried ingredients
Coconut : 1 Cup
Raw Mango :  1 (Small one)
To Add :
Salt : As required
Jaggery : 1 Tablespoon
Turmeric powder : A little
Pepper Pods : 3 to 4
Seasoning :
Mustard seeds : 1/2 Tsp
Ingh /Asafoetida : A little
Curry Leaves : 6 to 8
Green chilly : 2
Oil : 1 Tablespoon + 1tsp

Method :

1. Wash and cut Brinjal into big pieces. Soak the pieces in plain water for 10 minutes.


2. Prepare seasoning with mustard seeds, ingh and curry leaves. Add 2 green chilly.

3. Add cut brinjal pieces to seasoning and stir slowly.

4. Add a cup of water and little turmeric powder. Let it cook till soft. (Not very soft).
5. Keep a pan on the fire and add 1 teaspoon of oil. Add 1/4 tsp of methi seeds.
6. Fry till they turn slightly golden brown. Add urid dal and fry till they turn golden brown.
7. Add coriander seeds and byadagi chilly. Fry all the ingredients nicely for a minute on low flame.
8. Put off the fire and add ingh/asafoetida. Mix it well and let it cool.
9. Grate a cup of fresh coconut.
10. Wash and cut mango into small pieces.
11. Grind coconut, cut mango pieces,pepper pods and fried ingredients with required water.

12. Add salt and jaggery to cooked brinjal and stir slowly. Let it boil.

13 Add ground coconut mixture to cooked Brinjal. Mix it nicely and let it cook for 2 to 3 minutes.


14 Shift the curry to a serving dish and add cut coriander leaves.

15. Add a tablespoon of coconut oil on the top and serve.

Note :

Adding little coconut oil on the top just before serving taste best. (Optional).
You can use any type of brinjal to prepare this curry.
Adding more chilly is optional.
Adding tamarind instead of raw mango is optional.
Time 30 Minutes.
Serves : 3 to 4 .

Saturday, March 21, 2020

Bottle Gourd Jeera - Pepper Curry

Bottle Gourd /doodhi/sorekai is one of the healthy vegetable and it has become very popular these days. It is filled with vitamins and minerals. It helps to regulate the blood pressure and sugar level in our body. It is filled with fiber.

I have used bottle gourd, moong dal, coconut, jeera and pepper.

Let us see some benefits of eating Pepper in our diet.

Peeper has been used since ages and it is loaded with medicinal values. It is known as king of spices and we Indians do use in our cooking. It is high in antioxidant and helps to improve damaged cells in our body. It is loaded with anti inflammatory properties. It helps to improve blood sugar level. Pepper also helps in lowering the cholesterol levels. It is good for cough and cold. it helps in absorbing nutrients from the food we eat. It good for digestion. It is good for brain health. It is said that  it may help the brain health. ( Avoid losing memory).
No Onion or No Garlic Curry .
Let us see the recipe now :

To Cook :

Bottle gourd pieces : 1 Bowl
Moong dal : 1/2 Cup
Green chilly : 2
To grind :
Coconut : 1 Cup
Jeera /Cumin seeds : 1/2 Teaspoon
Pepper Pods : 5 to 6 pods
Ginger : An inch
To Add :
Ground coconut mixture
Tamarind Tokku : 1 Teaspoon
Salt : As required
Turmeric powder : A little
Coriander leaves : 1 Tablespoon
To Season :
Coconut Oil : 1 Tablespoon
Mustard Seeds : 1/2 Teaspoon
Ingh /Asafoetida : A little
Curry leaves : 5 to 6

Method :

1 Wash and remove the outer layer of bottle gourd. Cut bottle gourd into small  small pieces.


2. Wash and cook moong dal with required water.


3. Wash coriander leaves, curry leaves and cut them in to small pieces. Wash ginger and scrape out the outer layer. Cut ginger into pieces and keep it aside.
4. Prepare seasoning with coconut oil and add cut bottle gourd pieces. Mix it well and add water. Let it cook till the pieces are soft. Add little turmeric powder while cooking. Add cut green chilly.


 5.Grate coconut and grind with pepper, jeera and ginger with required water.


6. Now mix cooked dal and cooked bottle gourd pieces. Add tamarind tokku. Add salt. Stir slowly and mix the curry well.


7. Add ground coconut mixture and mix it well.

8. Let it cook on medium flame for 4 to 5 minutes. Stir in between so that it does not get burnt at the bottom.

9. Shift bottle gourd, jeera - pepper curry to a serving dish. Add cut coriander leaves.


10. Serve bottle gourd, jeera - pepper curry for lunch or as you wish. (with chapati or any other main dishes).

Note :

Cut bottle gourd in to small pieces so that it cooks quickly. Adding more chilly is optional. Adding toor dal instead of moong is optional.
Adding tamarind pulp instead of tamarind tokku is optional.
Time : 30 Minutes.
Serves : 3 to 4.

Sunday, January 19, 2020

Pumpkin Dal

Pumpkin is filled with loads of healthy properties. It is always better to make use of the natural benefits from vegetables.
Here is  Pumpkin Dal that you can try and enjoy your meal.


Here is a Pumpkin Dal that I have prepared and it is mild, delicious and nice to have with all the main dishes like plain rice, chapatis, rotis, pooris, dosa or idli.
I have used " Pumpkin ", toor dal, green chilly and a little rasam powder. (Freshly done at home).
Let us see some benefits of eating " Pumpkin " in our diet.
Pumpkin is one of the winter squash. They are rich in healthy properties. It is low in calorie and good for weight loss. It is rich in antioxidants and helps to boost our immune system. It helps to protect our eye sight. It is rich in Vitamin A. It protect us from chronic diseases. Pumpkin is rich in Vitamin C, Vitamin E and Potassium. It is good for our skin and rich in fiber.
No Onion or No Garlic is used here in this " Pumpkin Dal ".
It is simple, quick and healthy and suits to all age group.
Let us see the recipe now.

Things Needed :

To Cook :
Toor Dal : 1 Cup
Pumpkin Pieces : 1 Bowl. (Half of 1 small pumpkin).
To Add :
Green chilly : 2
Rasam Powder : 1 Tbs
Grated raw mango : 2 Tbs
Mustard Seasoning : 1 Tbs
Salt : As required
Seasoning :
Cooking Oil : 1 Teaspoon
Mustard Seeds : 1/2 Tsp
Jeera/Cumin seeds
Ingh /Asafoetida : A little
Curry Leaves : 6 to 8

Method :

1. Wash and remove the outer hard part of pumpkin and cut into small.
2. Wash dal and pressure cook for 5 to 6 minutes. Wash curry leaves and green chilly.


3. Add pumpkin and 1/4 tsp of methi seeds and  cook  for 4 to 5 minutes.
4. Wash and grate mango and add it to cooked dal.


5. Add salt and little turmeric and mix it well. Add slit green chilly.
6. Add rasam powder, mix all the ingredients well and cook for 2 to 3 minutes.


7.  Shift Pumpkin dal to a serving dish and add mustard seasoning.


8. Pumpkin dal is ready to serve.

9. We had it with plain rice and raw mango tambuli.

Note :

Use of pressure cooker to cook dal helps the dal to cook well. Cook Pumpkin separately. Adding methi seeds reduces the cholesterol in food. Home made rasam powder adds to the taste.
Adding more chilly is optional.
Time : 30 Minutes.
Serves : 2 to 3
Home made Rasam Powder :
Dry fry 1/4 tsp of methi seeds, 2 to 3 tbs of coriander seeds, 5 to 6 byadagi chilly, 1/2 ts of jeera. Add little ingh/Asafotida.
Dry grind once it is cooled.  (Only for 1 time use).


Friday, January 17, 2020

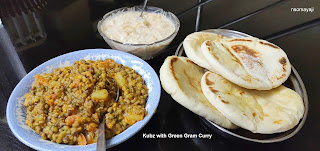
Simple Green Gram Curry

This Green Gram Curry is a simple and yummy curry. This curry goes well with all the main dishes.
We do prepare this Green Gram Curry very often,


As I said it is easy, simple, quick and needs very minimum ingredients.
I have used Green Gram /Whole moong, tomatoes, garam masala, rasam powder.
I prepared this curry for having Kuhbz a type of roti. This Kahbz or Kubz is brought all the way from Dubai by our close friend Pushpa Talitaya. This is a bring back memory of eating Kuhbz after some years.
Kuhbz is normally baked in clay oven and it is the traditional dish from Middle easy, Iran, Lebanon.

No Onion or No Garlic Dish.


Let us see the recipe now :

Things needed :

To Cook
Whole moong/Green Gram : 1 Cup
Tomatoes : 2 to 3
Potatoes : 2 (Medium sized)
Methi Seeds : 1/4 tsp
To Add :
Garam Masala Powder : 1/2 Tsp
Rasam Powder : 1 Tsp
Green chilly : 2
Ginger : An inch
Salt : As required
Butter ; 1 Tbs
To Season :
Cooking Oil : 1 Tablespoon
Jeera /Cumin Seeds : 1/2 Tsp
Mustard seeds : 1/2 Tsp
Jeera /Cumin seeds : 1/2 Teaspoon
Curry leaves : 6 to 8

Method :

1. Wash and soak whole moong for 4 to 5 hours or you can cook them without soaking.
2. Wash and cut tomatoes, green chilly, coriander leaves and curry leaves.
3. Wash and peel off ginger outer layer and grate ginger and keep it aside.
4. Wash and cut potatoes with its skin and keep it aside.
5. Keep a pressure cooker on the fire and put whole moong, cut potatoes, slit green chilly and 1/4 tsp of methi seeds.
6. Add required water and cook it for 6 to 8 minutes. Leave it for cooling.
7. Keep a pan on the fire and heat. Add a tablespoon of cooking oil, mustard seeds.
8. Let it splutter. Add jeera and curry leaves. Add cut tomatoes, Grated ginger and fry nicely.
9. Add garam masala powder and rasam powder. Add little turmeric powder.
10. Stir nicely and add required salt. Add cooked moong and potatoes.
11. Add required water and cook nicely for 3 to 4 minutes. Stir in between.
12. Shift the ready Green Gram curry to a serving dish, add cut coriander leaves and butter.
13. Serve with rotis, chapatis, poori or even dosas.
14. We had this Green Gram Curry with Kabz, a type or roti You get in Dubai.

Note : 

Soaking whole moong helps the moong to cook well and good nutritious too. Adding more spices is optional. Adding butter is optional. Adding more chilly is optional. Soaking whole moong is optional. You can cook whole moong without cooking also.
Time : Soaking time 4 hours + cooking time 30 minutes.
Serves : 3 to 4.

Friday, January 10, 2020

Cow Pea & Bottle Gourd Curry

Cow pea / ಅಲಸಂದೆ and bottle gourd Curry is a side dish that goes well with all the main dishes like lunch, chapatis, rotis, idli, dosa, poori or chapati.


Cow pea season is here and lots of fresh cow peas available in market in most of the places.
It is always better to use seasonal pods to get good nutrients from the pods.
I have used cow peas, bottle gourd and carrot. Used some fresh fried spices which is always there in the kitchen store.

Let us see some benefits of eating Cow Peas in our diet.

Cow peas are low in cholesterol, saturated fat and sodium. They are good source of protein. They are rich in Vitamin A, Vitamin C, Vitamin B6, Calcium, iron, magnesium, potassium, copper and manganese. Cow Peas is rich in fiber.
Cow peas is rich in magnesium and it is good for controlling our sugar level. It also take care of metabolism of our body. It helps our digestive system to be healthy. It helps to control our blood pressure and take care of it. Cow peas helps in loosing the extra weight and good for people who suffer from anemia. Eating cow peas is good for our skin health. It is good for our bones.
Let us see the recipe now :
No Onion or No Garlic Curry.
Try and enjoy the taste of Cow Pea & Bottle Gourd Curry.

Things needed : 

To Cook :
Cow Peas : 1 Bowl (250 Gr)
Bottle Gourd : 1/2 (1/2 From medium sized bottle gourd)
Carrot : 1
To Fry :
Urid dal : 1 Tablespoon.
Red Byadagi chilly : 5 to 6
Ingh /Asafoetida : A little
Pepper Pods : 5 to 6
Curry Leaves : 6 to 8
Coconut : 1 Small cup
Coconut Oil : 1 Tsp
To Grind :
Tamarind : Small marble size
Fried and cooled mixture.
To add :
Coriander leaves
Salt : As required
Seasoning : Mustard seeds 1/2 teaspoon, ingh : a pinch, Curry leaves : 5 to 6 with coconut oil.


Method :

1. Remove the pods from Cow Peas and wash it nicely.


2. Wash and remove the outer layer of bottle gourd and carrot. Cut them in to small pieces.

3. Pressure cook cow pea, bottle gourd and carrots with required water for 5 to 6 minutes. Put off the fire and let it cool.

4. Keep a pan on the fire and heat. Add a ts of coconut oil.
5. Put urid dal and fry till they turn slightly golden brown. Add byadagi chilly, pepper pods and fry.
6. Add ingh and curry leaves. Mix it well and put off the fire. Add coconut. Let it cool.


7. Grind fried ingredients with tamarind and required water.
8. Grind into fine paste.

9. Keep cooked vegetables on fire. Add salt and little turmeric powder. Mix it and boil for a minute.


10. Add ground coconut mixture to the boiling vegetables and mix it nicely. Add water if required.
11. Let it cook for 2 to 3 minutes. Stir in between so that it does not get burnt.


12. Shift the Cow Pea & Bottle Gourd Curry to a serving dish.


13. Add mustard seasoning done in coconut oil.


14. Serve for lunch or with any main dish of your choice.


Note :

Do not over cook the vegetables. Adding more chilly is optional. Use of coconut oil is optional.
Use of coconut more or less is optional. Do not boil more after you add ground coconut mixture.  2 to 3 minutes is more than enough.
Time : 30 Minutes.
Serves : 3 to 4. 


Jack fruits Seeds Tikki

Jack fruits are healthy Seasonal fruits. The seeds also contain lots of good vitamins and minerals.  After eating the fruit we throw away th...

About

author
My name is Nalini Somayaji. Teaching is my profession. Cooking is my passion. Reading, travelling, visiting new places, having fun with kids are some of the hobbies I can say. My recipes are Healthy, quick, easy and simple. Grown up being a traditional family member I love and respect Indian culture and traditions. Love classical dance and music.
Learn More →